How to Fix PCB Trace? Step-by-Step Guide
Printed Circuit Boards, commonly known as PCBs, are at the core of almost every electronic device. These boards use thin copper pathways called traces to carry electrical signals between components. When one of these traces gets damaged, the entire device can stop functioning or behave unpredictably. Instead of replacing the entire board, it is often possible to fix PCB trace damage with the right approach and tools.
Trace damage can happen in many ways. Overheating during soldering, physical impact, corrosion, moisture exposure, or incorrect repair attempts often weaken or break copper lines. In industrial environments, vibration and continuous heat also contribute to board failures. Understanding how trace damage occurs helps technicians repair it correctly and prevent future issues. This guide explains a practical step-by-step method to repair damaged traces safely and effectively.
Tools Required for Trace Repair
Before starting, gather proper PCB board repair tools to ensure a clean and safe repair. Working without the right tools can cause more damage and lead to unreliable results. Preparing everything in advance helps complete the repair smoothly and reduces handling time on sensitive circuit areas.
Essential tools include:
- Temperature-controlled soldering iron
- Thin solder wire and flux
- Multimeter for continuity testing
- Tweezers and a precision knife
- Isopropyl alcohol for cleaning
- Thin copper wire or jumper wire
- Copper tape or repair kits
- Protective coating or epoxy
Using professional tools prevents additional board damage during the repair. Good lighting and a magnifying lamp are also highly recommended because PCB traces are extremely thin and difficult to inspect with the naked eye. Anti-static wrist straps help protect sensitive components from electrostatic discharge during handling.
Keeping solder wick or a desoldering pump nearby also helps remove excess solder if mistakes occur. Organising tools properly ensures safer handling and leads to cleaner, longer-lasting repair results.
Step-by-Step Guide to Repair PCB Trace
Repairing a damaged PCB trace requires patience, proper tools, and a clear understanding of the repair process. Even a small break in a copper path can interrupt electrical flow and cause device failure. Following a structured repair method helps restore the connection safely while preventing further board damage. The step-by-step guide below explains how to identify, prepare, repair, and test a damaged trace so the circuit board can function reliably again.
Step 1: Disconnect Power and Remove the Board
Always disconnect power before handling electronics. Remove the board carefully from the device to avoid further mechanical damage. Static discharge protection is also recommended when handling sensitive electronics. Take photos of cable connections before removal so reinstallation becomes easier later. Store screws and connectors safely to prevent loss or mix-ups during reassembly.
Step 2: Locate the Damaged Trace
Inspect the board visually for burnt or scratched areas. If the break is not obvious, use a multimeter in continuity mode to trace the electrical path and find where the signal stops. Mark the damaged area for easier repair. Sometimes multiple traces are damaged, so checking nearby lines helps avoid incomplete repair. Also inspect component pads around the area since pad lifting can interrupt signals even if the trace looks intact.
Step 3: Clean the Damaged Area
Clean the section using isopropyl alcohol and a soft brush. Remove dust, burnt residue, or solder debris. Cleaning ensures proper bonding when solder or repair material is applied. Allow the board to dry completely before proceeding. Moisture trapped during repair can weaken solder joints and cause corrosion later. Proper cleaning also helps reveal hidden cracks or lifted copper that may need additional attention.
Step 4: Expose Fresh Copper
Use a small blade or fiberglass pen to gently scrape the protective coating from both ends of the broken trace. Exposing fresh copper allows solder or wire to attach securely. Take care not to damage nearby traces or pads during scraping. Work slowly and only remove enough coating to create a solid soldering point. Excess scraping can weaken the board surface or accidentally cut adjacent traces.
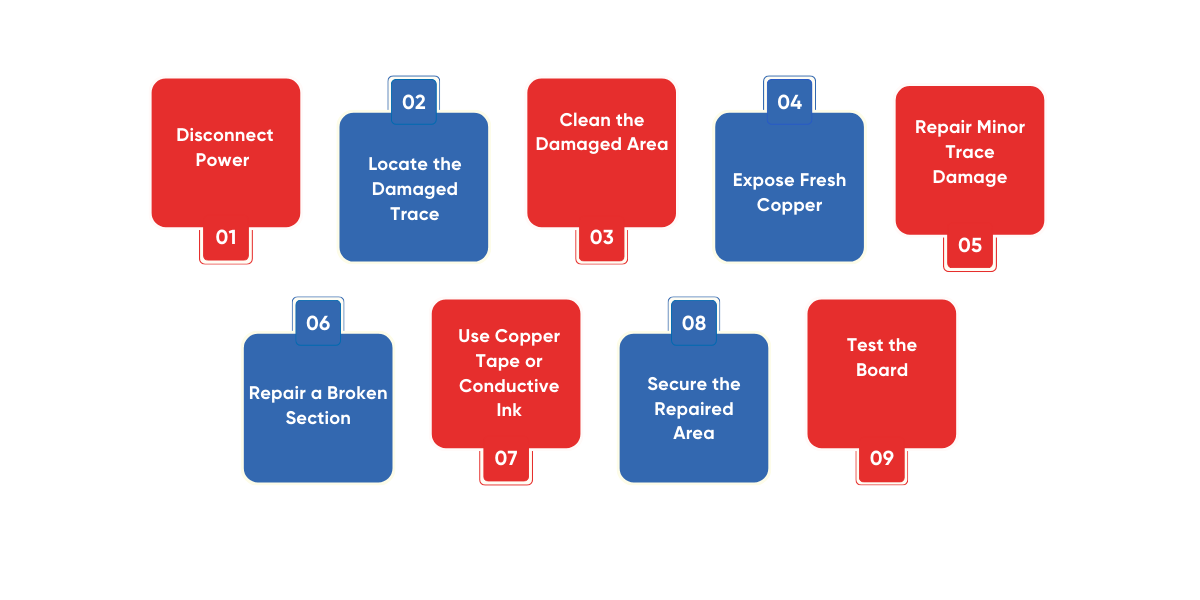
Step 5: Repair Minor Trace Damage
If the copper path is only scratched but still present, apply flux and carefully add a small amount of solder to bridge the weak section. This restores electrical flow without adding bulky material. Check continuity afterwards to confirm the connection is restored. Avoid applying too much solder, as this can create short circuits with nearby lines. Smooth solder flow ensures a stronger repair.
Step 6: Repair a Broken Section with Jumper Wire
If part of the trace is missing, solder a thin insulated wire between both exposed ends. Keep the wire short and routed neatly to avoid touching other components. This method works well when there is enough space around the damaged section. Secure the wire with adhesive or coating to prevent movement, especially in equipment exposed to vibration or movement.
Step 7: Use Copper Tape or Conductive Ink
When repairing longer sections, copper tape or conductive ink is often used. Tape is placed along the missing trace path and soldered at both ends. Conductive ink can also be painted across the damaged area. Once dry, apply a protective coating to secure the repair. Ensure the tape does not overlap nearby traces, and double-check continuity before sealing the repair area.
Step 8: Secure the Repaired Area
Movement or vibration can break down repairs over time. Apply epoxy or protective coating to hold wires or tape in place. This step increases durability, especially in machines exposed to vibration. Allow sufficient curing time before reinstalling the board. Rushing this step may weaken the repair.
Step 9: Test the Board
After repair, check electrical continuity again. Reinstall the board and power the device carefully while monitoring operation. Watch for abnormal heating or malfunction. If everything works normally, the repair is successful. It is also recommended to operate the device for a short period under supervision to confirm long-term stability before returning it to full service.
Complete Your PCB Trace Repair the Right Way
Learning how to repair damaged traces is an important skill for anyone working with electronics. Whether damage occurs due to overheating, corrosion, or mechanical stress, careful inspection and proper techniques can restore most boards successfully. Companies offering industrial electronics repair in Dubai are equipped to handle sensitive industrial boards and restore them to working condition without needing costly replacements.